


Homemade Nutty Cones
- Jul 28, 2017
- 4 min read

Usually in the summer when most people have whittled down and are strutting around town in slinky summer attire, I am busting seams left and right after gorging on my favourite ice cream treats...I can't help myself, I blame it on the heat!! These homemade Nutty Cones will definitely help you get through any heat wave but just make sure you wear something with a little "give" after a few of these decadent little gems!

Since these Nutty Cones are loaded with smooth vanilla ice cream, butterscotch sauce or caramel sauce, chocolate and peanuts, it will be hard to stop at one...or 3...but that's okay, you can always walk to the store to get the ingredients to make another batch!
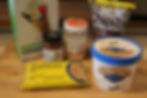
You will be surprised at how easy these sweet treats are to make at home...all you need is: waffle cones, vanilla ice cream, a jar of store bought or homemade butterscotch or caramel ice cream sauce, milk chocolate chips, unrefined, virgin coconut oil (this oil has very little or no coconut flavour and scent...this is the hardening ingredient for your chocolate dip sauce) and salted peanuts.

First, place 6 empty drinking glasses or jam jars onto a cookie sheet and stand 6 waffle cones upright in the jars.

Next, to make the chocolate coating, in a large glass measuring cup (or a small microwave safe bowl) add 2 cups of milk chocolate chips and a 1/4 cup of coconut oil. Microwave for approximately 1 minute, then stir until smooth.

Spoon about 1 tbsp. of chocolate sauce into the bottom of each cone...set aside.

Next, spoon some slightly softened ice cream into the cone, filling just to the top of cone (you will place a scoop of ice cream on top later)...repeat for each cone.
Next, I used a chopstick to poke down into the ice cream to make a hole for the butterscotch sauce...if you don't have a chopstick. a long thin knife will work too...just insert it into the cone and twist it around creating a well...repeat for each cone.

Pour about a 1/2 cup of butterscotch sauce into a ziploc bag with the corner snipped off and (working quickly), fill the holes with sauce.

Next, place a scoop of ice cream on top of each filled cone...
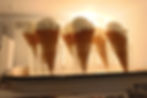
Place tray of cones into the freezer for about 10 minutes to slightly firm up before dipping in the chocolate sauce. (The cones will be top heavy so be careful transporting the tray to the freezer...I had a swearing attack as 4 of my jars tipped over en route to the feezer!)
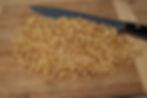
While the cones are in the freezer, chop about 1 cup of salted peanuts into small pieces...set aside,
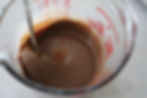
...then place the chocolate sauce in the microwave for about 15 seconds, stirring again until smooth. (You want your sauce fairly thin for dipping).
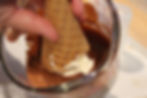
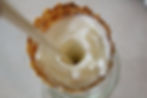
Remove cones from the freezer, then dip each cone top into the chocolate mixture...
...allowing the excess sauce to drip off for a few seconds...

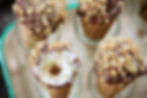
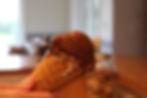
...then sprinkle the chopped peanuts over top of the chocolate...work quickly before the sauce hardens onto the ice cream (sprinkle the peanuts onto cone over top of a plate to catch the falling peanut pieces). Repeat steps until each cone is dipped and sprinkled with peanuts.

Place tray back into the freezer and freeze until the ice cream has hardened...when all cones have hardened, wrap each one in waxed paper or a medium ziploc bag and store in the freezer (hidden away so nobody else in the family sees them...greed will quickly take over here people...I mean it!!)


Enjoy your homemade Nutty Cones and try your hardest to NOT eat the chocolate off of each cone before your husband gets home from work!
Homemade Nutty Cones
6 waffle cones
1.5 litres (or 1&1/2 quarts) of vanilla ice cream
1 jar of store bought or homemade butterscotch sauce or caramel ice cream sauce
2 cups of milk chocolate chips
1/4 cup of *unrefined, virgin coconut oil
1 cup of salted peanuts, chopped
1. Place 6 shallow drinking glasses or jam jars onto a baking sheet and stand 6 waffle cones upright in jars.
2. In a small microwave safe bowl or a large glass measuring cup, add the chocolate chips and coconut oil...microwave for about 1 minute then stir until smooth.
3. Spoon about 1 tbsp. of the chocolate sauce into the bottom of each cone.
4. Spoon slightly softened vanilla ice cream into the cone just to the top of cone...you will add a scoop of ice cream to the top later.
5. Using a chopstick or a long, thin knife, poke it into the ice cream and twist creating a hole down the middle of the ice cream filled cone.
6. Pour about a 1/2 cup of butterscotch sauce into a ziploc bag with the corner snipped off and fill the hole of each cone with the sauce.
7. Place a scoop of ice cream on top of each cone then place tray into the freezer for about 10 minutes to slightly firm up.
8. While the cones are in the freezer, chop about 1 cup of salted peanuts into small pieces and set aside.
9. Microwave the reserved chocolate sauce for about 15 seconds, stirring until smooth (you want your sauce fairly thin for dipping).
10. Remove cones from the freezer then dip each cone top into the chocolate topping...let the excess sauce drip off for a few seconds.
11. Sprinkle peanuts over top of chocolate topped cones, working quickly before the sauce hardens onto the ice cream.
12. Place cones back into the freezer for several hours or until ice cream has hardened. Wrap each cone in waxed paper and store in the freezer.
* the unrefined, virgin coconut oil has very little, if any coconut flavour or scent...you can find it in the health food section of your grocery store...the other varieties of coconut oil may have a coconut flavour.
* Makes 6 cones